Installing Ubuntu Linux
You are now going to install Ubuntu Linux to the empty space on your hard disk that you prepared in the earlier step. Linux by itself is not a single monolithic entity unlike some popular operating systems. It is very much a collaborative effort. It consists of a core (also called a kernel) on which the entire system is built on an runs. Linux is modular. As you become more experienced, you will realise that you can add and remove modules depending on your requirement and create a highly customised system. No hidden agandas, no long cryptic EULAs (the thingy which you blindly scroll down and click "I agree" without batting an eyelid) - just freedom.
So let's get started !!
Ubuntu CDs are available for free from
SHIPIT
You can also download it from
Ubuntu website or ask a LUG (Linux User Group) near you.
To boot from the cd or dvd your bios should have it as the first boot device. Alternatively some bios allow you to select the boot device. The key used for this varies with different manufacturers. To see if your bios has a boot device select menu please refer the manual of your motherboard or take help from a more experienced friend.
I suggest you try the following - insert the cd or dvd and start your pc. If your pc boots too fast simply restart windows with the cd or dvd in the drive and see what happens. Very often the optical drive would have been set as the first boot device and the system boots from the cd automatically. If it still goes to windows and refuses to boot from your cd or dvd then you will have to adjust your bios settings or search for a boot menu as I described earlier.
If your pc boot successfully from your ubuntu cd you will see this screen

It is prompting you to select the language. Use your arrow keys to select the system language and press ENTER. You will then get this screen

Use the Up and Down arrow keys on your keyboard to select the option Install Ubuntu and press ENTER. The system will start booting.

You will see the Welcome screen in your language. Make sure your language selection is right and click forward

Select your timezone from the list, it is arranged by continent, and click forward

Select your keyboard type, most common is US International (see picture below), but make sure and use the test box made available to you to check your selection. If it does not work try USA -International with AltGr dead keys like I have. I advise you to select this if you use US Intl in India. Check not only for alphabets, capital and small, but also for special characters like ' " ? / + ; If all these are correct then your choice of keybord layout is fine, click forward

You will now be presented with the partitioning options. Ubuntu "intelligently" offers to resize your windows partition and do everything automatically. I advise AGAINST using this option, and instead select the manual option and click forward


You will now come to a screen which shows you the layout of partiitons on your hard disk. Just as I mentioned earlier, note the nomenclature used in linux. The first hard disk is labelled as /dev/sda Partitions within this are labelled as /dev/sda1 /dev/sda2 so on and so forth. /dev/sda2 is the C drive and has an ntfs filesystem, whereas /dev/sda1 is the system reserved partition and has no drive letter.

 or
or 
How you proceed from here will now depend on your existing hard disk partitions, and how much space you are willing to allot for Ubuntu.
Select free space and click on the "New Partition" button as shown below
Scenario 1

Scenario 2
Select type of partition logical, size 20000 MB (scenario 1) or 20000 MB (scenario 2), location for new partition Begining, Use as: Ext 4 journaling file system, mount point: / and click OK
Scenario 1

Scenario 2

The proposed partition table layout will get updated as shown below:
Scenario 1

Scenario 2

Again select free space and click New Partition. Select type of partition logical, size: Note the size mentioned, and subtract the amount of space you would like to dedicate to the swap partition. In my case I subracted 1000 MB from that figure. Swap space is recommended to be 1.5 times the amount of RAM you have, so if you have 1 GB RAM, 1-1.5 GB swap should do. Location for new partition Begining, Use as: Ext 4 journaling file system, mount point: /home and click OK. Note that you will manually have to type in the mount point in the box provided as /home
Scenario 1


Scenario 2

The proposed partition table layout will get updated as shown below:
Scenario 1

Scenario 2

Again select free space and click New Partition. Select type of partition logical, size: no change if it is roughly 1.5 times your RAM, location for new partition Begining, Use as: swap area, and click OK
Scenario 1

Scenario 2

This is how your proposed partition table layout finally looks like.
Scenario 1:

Scenario 2:

Remember, nothing has actually happened to your partitions as yet, this is just a proposed layout, so if you make a mistake in your newly created linux partitions you can simply go back and redo the partitioning. Make a note of all the partitions (numbers) on a piece of paper, especially the root partition.
-------------------------------------------------------------------------------------------------------------
Edit:
Mounting Windows partitions:
This is something I forgot to write about in the original tutorial. Note your windows partitions and filesystems in the partition table. They will be marked as ntfs or vfat/fat32. If you have a 100 MB fist partition as is the case here, skip it as this is the boot partition (/dev/sda1). Select on /dev/sda2 or as is in this case, /dev/sda5 and click edit partition.

Against Use as:, click Do not use this partition and change the filesystem to ntfs or fat32, depending on what you read in the proposed partition layout. It is ntfs in this case. Make sure that you do not tick Format this partition.


Enter a suitable mount point. In this case I have entered /windows/c as this is my C drive in Windows 7.


Repeat the above steps for each windows partiiton assigning new mount points for each, so that the final proposed partition layout looks like this

End Edit
---------------------------------------------------------------------------------------------------------------
Click Forward. You will now be asked some details about yourself. You will have to give a password. Make sure you don't forget it. Click Forward

If your password is not strong you'll get the following prompt. You may choose to ignore it and continue or go back and change your password.

Import your windows settings. This is optional you can leave it unchecked and click forward. There is a chance that this step may not appear.
You will now be presented with an overview of the install parameters. Before you proceed you will have to change the install location of the GRUB bootloader which will otherwise get installed to the MBR, and everything will go to hell.

Click Advanced, and in the dialog box that opens click on the dropdown list and select your root partition, and click OK.

  
Click Install, the installation will begin with the formatting and copying of files to your hard disk.


At the end of installation click on the Restart Now button

As the system shuts down, you will get a message telling you to remove the cd from the drive and press ENTER to reboot the system, which you must do.
Your PC will boot directly to Windows, as the GRUB bootloader has been installed to the root partition. We will now have to install a third party bootloader, the GAG bootloader.

Press 4 to install GAG. You will get this screen

Select your keyboard (usually 1 in India)
then your language, 8

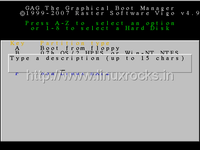
You will then come to this screen. press S to setup the bootloader

The alphabets you have to press to execute a function are highlighted in red in the GAG set up screen. Keys are case insensitive. Press A to add an operating system

As you can see, partition A is the floppy, B is the first ntfs windows partition (which is the boot, system reserved in Windows 7), and the second ntfs windows partition is C, so press B

You will now have to type a name, say Windows 7

You will have to now type a password, optionally, so press ENTER to avoid giving one

You now have to select an icon, Press C for windows

Now you will come back to this screen

Press A to add an operating system
Now if you remember the first partition you made for linux was root (/), to which we installed GRUB. So the alphabet you have to press corresponds to the first "LINUX EXT2" partition in the list you see onscreen. Do that. Simple !
You will now have to type a name, say Linux
You will have to now type a password, optionally, so press ENTER to avoid giving one
You now have to select an icon, Press D for Linux
Now you will come back to this screen
Press H to save in the hard disk, you will get this message, press ENTER

Press R to return to the main menu, you should see this

Extra options in the setup include setting a timer for a default OS to boot.
Read the index.html file in the docs folder of the gag file you downloaded.
All the best !!!


 or
or 


